Showing posts with label RV-12-0760. Show all posts

Monday, April 25, 2016

First Flight!

Today was the day!  (well, yesterday.)

After much wringing of hands and double checking and running inspection checklists, I finally committed to actually flying.  I had a support & photography staff of 3: best friend Dale and his wife, Carol, and Dave R, whom I met when he started his own RV-12.   (My wife wanted to know about the flight after the fact.)

Overall, the flight went almost exactly as planned, and with no unexpected findings or upsets.   I made one more high speed taxi test, actually on runway 28.  I used full throttle for the first time to verify that full torque did not produce unmanageable behavior.  Taxied back to 28 (and then back-taxi to reach the actual departure end, since there’s construction in progress) then took off with 0° flaps.    Climb was positive and smooth, at well over 700 fps at about 75-80 kts.   Airspeed and groundspeed agreed as expected, but quickly diverged at altitude, with a much stronger than expected wind from the south. (I’m not sure if that’s real or an artifact of a poorly calibrated airspeed.  The wind vector was pretty constant as I circled (15-18 from South), so it might have been real, but it’s still something to keep an eye on.)

I initially thought I had a heavy left wing, but it was actually very very well balanced in roll.  I think the stick is a touch left-of-center when the plane is straight and level.  If so, that shouldn’t be too hard to correct when I do the 1st inspection that calls for removing the seat pan to get at the linkages down there.

The over-the-nose visibility is excellent, even compared to the Cardinal (which has pretty good visibility of its own.) As a result, I had a tendency to hold too much nose up and I climbed well above my initial intention (quite arbitrary) of 4000’ and eventually ended up at 6000’.   Turning response was smooth in both left & right.  The electronic ‘ball’ was relatively insensitive, but quite usable.  This was the 3rd time (1st two were in DG’s RV-12) that I was flying behind all glass, and I could tell that it would be some time before it was 2nd nature.  Luckily, this is a plane that is all about keeping your eyes out of the cockpit and looking out side and flying by the seat of your pants.

Descent to pattern altitude was unremarkable from an airframe perspective, but I did note the infamous throttle creeping behavior associated with the springs in the carburetors.  Even with the friction lock fully tightened, the throttle can easily be turned using the vernier mechanism.  I think that the vernier ‘creeps’ due to the engine vibration and the springs.

I made a low pass over 28 and then executed a balked landing in order to get a feel for the pitch changes associated with that maneuver.  There weren’t any.  OK, now if I need to abort a landing, I’ll have done one before.  Set up for another circuit, and made one of the nicest landings I could ask for.  The idle stops are set a tad too high, and I couldn’t get less than 2500 RPM (1000 prop RPM) on approach, and that led to a long, long float before she touched down.  (I will have to set the idles back far enough that the engine probably won’t run on the main carbs when cold, but that’s exactly what the choke circuits are for.)

Taxied back to the hangar, got pats on the back from my friends, and buttoned up the hangar.  I didn’t write down any of the numbers on the flight card out of the Product Acceptance Procedure.  I’ll download the black-box data next week (next opportunity to get to the airport) and fill in as much as I can, and then do a very thorough post-flight inspection.


IMG 0007
ready to start


IMG 0015
taxiing out


IMG 0021
perfect day!


video, courtesy of Dave Rohrlick 


IMG 0025
RV Grin!

Saturday, April 23, 2016

the "Golden Spike"

(Well, it’s some aluminum plates to be honest, but you get the idea.)

There’s nothing left to do.  Fuel tank is fixed.  Engine is sync’ed. Cables are tight.  Paperwork is in order. Prop is pitched.  Tonight’s task was to put all of the loose pieces back on the plane to make it actually airworthy.  It took about 2 hours.  The lower cowling is ‘tight’ after the engine remove/re-install, but I got it back on without any cussing or drilling.  Upholstery went well in front and in the mid section, but I discovered that you can’t get the upper bulkhead cover back on without removing the fuel tank.  Not today!  I’ll leave all of the carpet out of the back for now.

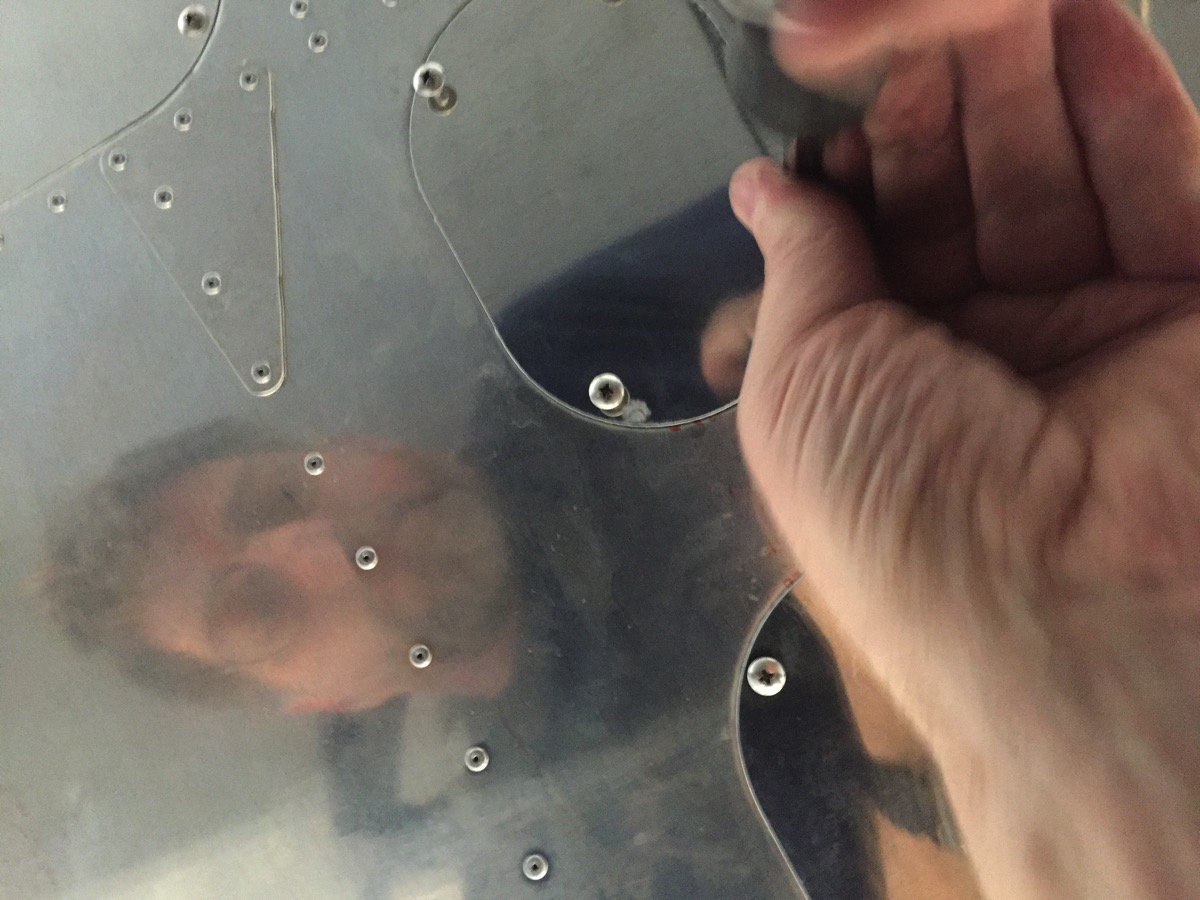
The ‘blue flower’ you see below represent the last items to be installed to make the plane “complete”.  Yes, there are still things to do (wheel pants, AoA sensor, etc.), but these 5 access panel covers are the last items out of The Book that need to be installed.   It was with great pleasure I removed the final bits of blue plastic and went to work.


IMG 5041

the last pieces to install 


Here’s a selfie of me installing the last access plate.  (Phone is sitting on my chest, activated w 3 sec delay from my watch).

IMG 5042

 Installing the last part


IMG 5072

All done.  Only thing left to do is go fly.

Sunday, April 3, 2016

fuel tank leaking

Damn.  I’m really getting tired of these setbacks.  Yesterday was a pretty good day for forward progress.  I bought 18 gal of premium mogas and went through the fuel calibration procedure (putting the rear wheels on 2” chocks to emulate normal flight attitude, telling the Dynon each time I added 2 gal). There was a little bit of spilling, enough so that the odor of gas was to be expected.

Today, I went out to check for leaks and found much more than I was expecting.  Based on the float gauge, maybe a gallon or two leaked out overnight.  Looking up at the main fuel connection, I found that the fuel was coming from above that spot.  Climbing up into the plane itself revealed a touch more information: there was about 1/2 cm of fuel wicking along the medial lower edge of the tank, thus implying that the leak may be on the rear medial seam.  I didn’t do much trouble shooting beyond that, so further investigations will need to wait until next weekend.

I put the nose wheel on a 2” block to make room for the large 7.5 gal transfer cans and removed the valve from the gascolator and used the pump to drain the tank as well as possible.  (Learning from yesterday, I paused near the end and put the rear wheels on blocks to get a bit more drainage from the tank.)

I’ll have to remove the tank (again!) and figure out where the leak is next weekend.  

Friday, April 1, 2016

split bulkhead modification; flight training

The fuel tank is empty, and I want to fill it up when I do add gas (to calibrate the EFIS).  The urge to take advantage of the currently empty state was too much to resist, so I pulled the tank yesterday in order to install the split bulkhead modification released by Van’s last fall.  (Ironically, they released the mod about a week after I gave up waiting for it and installed the tank and closed up the tail.)  It actually wasn’t as hard as I remembered: I thought to myself, “I must be getting better at this.”  I can confirm:  I had to pull it again today. 

Page 33-03 rev 2 starts out by calling out dimpling of all of the #40 holes in the smaller piece.  Unfortunately, the piece that I received had not been drilled.  I decided to just use the large piece as a template and drill my own.  Unfortunately, I didn’t think it all the way through.  I lined up the outside edges of the pieces as my reference, neglecting the fact that there were predrilled holes along the left edge (in the picture) where the small piece attaches to the aircraft.  I was so proud of my accomplishment that I installed the tank (and all associated plumbing) before I went to attach the large piece, only to discover that the custom holes that I had drilled were off by about 1/8”.

I removed the tank (again) and pulled out the offending piece and prepared to order a replacement from Van’s.  I then realized that I could salvage the situation by taking the now-surplus original bulkhead and cutting out a replacement small piece.  To ensure a better alignment, I took the new small piece and the large piece and attached them to the airframe and went to drill in situ.  The next minor set back was that there wasn’t a back stop to hold the work in place so the drill bit could bite.  I had to reach behind the large piece and hold the small one with my hand while I drilled. This introduced a touch of distortion, but I was able to make it all work.

BTW, I picked up crow’s feet wrenches a few weeks ago.  Should have done so last year!  They make installing the fuel / fuel return fittings much, much easier!


IMG 5004

New split bulkhead


IMG 5005

Split bulkhead with tank installed 


The Product Acceptance Procedure has a nice write up on how to approach Maiden Flight.  One of the pieces of advice was to get some upset recovery training in a similar sized / powered aircraft.  On a whim, I called the local FBO and got a lesson in this Evector LSA.  Today was pretty windy, and I actually felt pretty queasy by the time I was done.  i’ll definitely get another hour or so in the Evector before Maiden Flight.  (I’m tentatively looking at 4/16!)


IMG 5007

Thursday, March 31, 2016

Guess who's got a new home?

Little detour on my way to being airborne.  I’m working my way through the Production Acceptance Procedures and debugging some loose wiring of the EGT probes.  I also attended a nice lecture by the local EAA chapter which was held at the “condo” hangers at DLZ.  Just for fun, I dropped a line to inquire as to the actual cost of said hangars, expecting to get confirmation of the ~$100K that local wisdom had dispensed.  Instead, I was pleased to find that $45K was the actual asking price.   I did spend a day trying to fit both 7623V and 76012 into a slightly larger hangar, but that simply wasn’t practical.

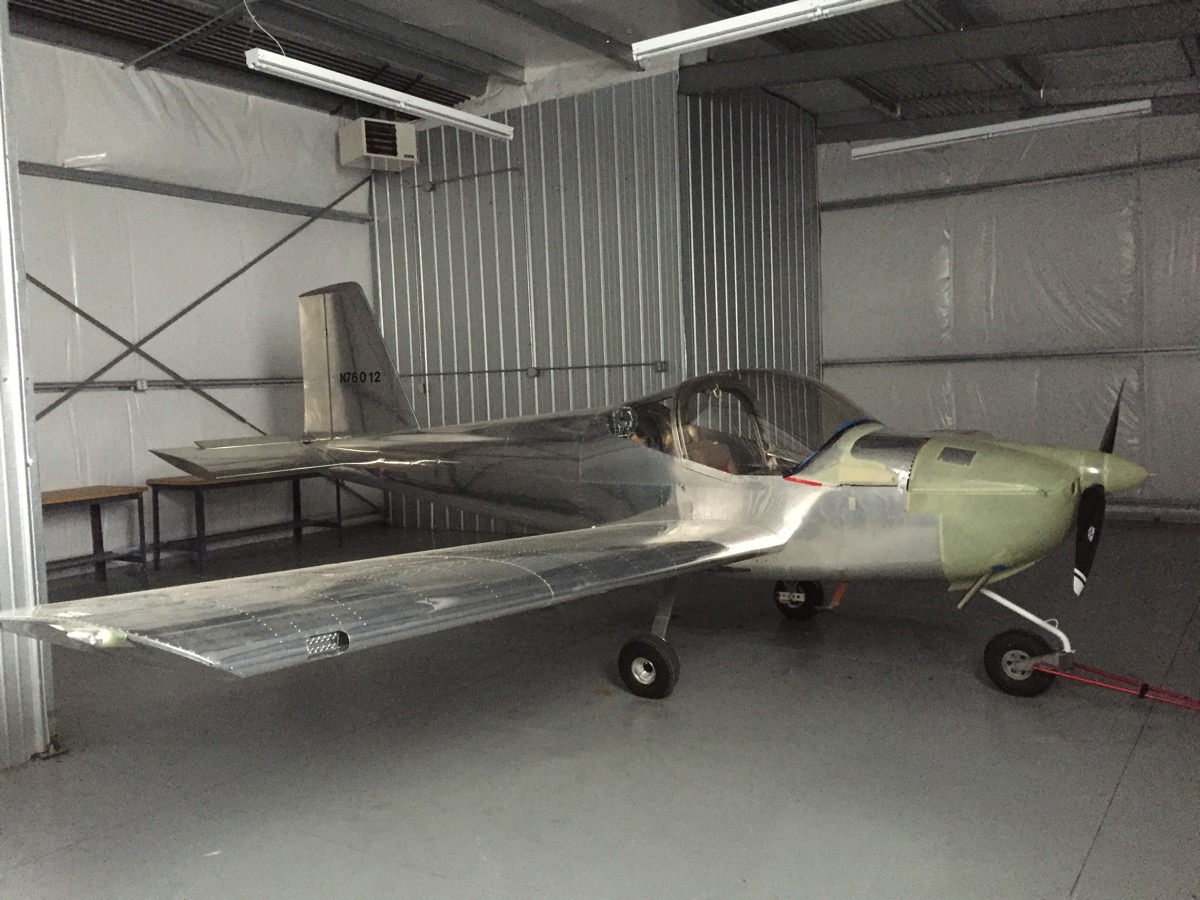
I did end up buying H-11 yesterday and spent the day moving the plane and all misc stuff from the old, drafty, cold, dark hangar that I rented over the winter and into the new (well, about 10 yr old), bright, insulated, heated hangar that I have to call my own.   BTW, in the photo below, the lights are not even turned on.  It’s amazing how much of an increased in perceived brightness is achieved with light colored (in this case, insulated) walls.

Today I finished up unpacking, finally got solid connections on the EGT probes and knocked out a couple of pages of the PAP.  The fuel tank was removed to make way for the split bulkhead upgrade.  Tomorrow, I hope to finish the bulkhead, reinstall the fuel tank, fill & calibrate the tank and resume the pneumatic balancing of the carburetors at full throttle.   

With luck, first flight will be in 2 weeks.


IMG 5002

N76012 in H-11

Saturday, March 12, 2016

miscellaneous updates

Well,  I got the plane over to Shamrock Air and had the carbs mechanically synched again.  Here’s a nice picture of Shane at the controls while we tried to figure out why I couldn’t get it to run the previous day.  (Water in the fuel system probably had much to do with it.)

IMG 4979

Shane, of Shamrock Air, preparing for a start


I’ve decided to move out of C-1 into one of the “condo hangars” on the west side of the ramp.  (More to follow as that deal progresses.)  They have two hangar sizes available, so I tried a hair-brained idea of seeing if both planes would fit into the larger size.  Technically, the answer is “yes”, but practically speaking, it’s “no.”  You can see both of the planes wedged into the 48’ hangar, but backing the 12 into the corner is very, very tricky.  The slightest movement of the nose causes very wide swings of the tail, greatly endangering the tail feathers against that outside corner.  Moving the Cardinal in requires a curved arc to get its tail feathers around the nose of the 12.  Even with Dale and the seller acting as spotters, it was very hard to ensure not hitting something.  All in all, it’s not worth the risk.  For now, 23V will continue to live in F-10.

IMG 4981

two birds in one hangar

Flap Handle Spring Modification

I shortened the spring by the 1/2” as called out by Notification 2015-10-01.  It’s much nicer to activate now and the spring no longer pushes the ‘button’ just out of the lip of the handle itself.  That, in turn, eliminates a prime finger pinching opportunity!  No pictures to post.   I’ll make a few more modifications that have been approved by Van’s as we get ready for flight test. 

Product Acceptance Procedures

I’ve returned to performing the product acceptance procedure.  It’s slightly tedious,  but rewarding to be making forward progress again.

Tuesday, March 1, 2016

back to where we were


IMG 4972

Back to engine testing


Well, at long last, as this winter comes to an end, I’m back to where we were in November when the broken bolt was discovered.  The engine has been re-attached and all of the various systems reconnected.  (Well, the R EGT is open and that’s a minor squawk for further workup.)  Coolant isn’t leaking on the ground.  Oil was replenished and purged.  New gas is in the tank and the battery was topped off with the battery tender.

The oil purge procedure was a bit interesting and I do think I had a good “Macgyver moment.”   I used a rubber  hose to connect the air compressor to the oil drain line to provide pressure (5 to 8 psi).  In order to see the oil pressure gauge, I used misc stuff in the hangar to set my iPhone in front of the panel and remoted the image to my Apple Watch.  Although small, it was enough for me to be able to see the oil pressure increase as I swung the prop through about 20 revolutions.  I recorded the peak pressure (32 psi; green) as my souvenir.


IMG 4971engine oil purge


It was finally time to try to fire it up.  Alas, the engine starts easily but does not run for more than 5 seconds.  When Paul (A&P working for Shane) was working on carb sync last November, we were to the point where the engine ran very rough and was not staying running well, so I am concluding we are back to where we left off.

Side Note

I’m ready to move out of C-1 and upgrade.  I’m in negotiation for either H-11 or G-8, which are very nice hangars with insulation, lots of electrical power, internet and heat!  H-11 would be a very nice place for either the Cardinal or the RV12, but G-8 might be large enough (48’) to hold both.  If so, I’ll buy that larger unit and have both planes in one hangar.  If not, I’ll probably relocate the RV12 to Bolton Field (KTZR) and the Cardinal into H-11 and swap locations when I need to use the heated hangar (e.g., annual inspections, etc.)  More to follow.


Tuesday, January 5, 2016

moving forward again!

December brought a halt to any work on the plane due to vacation and general scheduling issues.  I have this week off and spent yesterday at Shamrock Aviation, watching / learning / helping do major surgery on the engine.  Recall from a previous post, that Shane (proprietor of Shamrock Aviation) is rated Heavy Maintenance on the Rotax 912 and thus is able to do the work locally.  This was the 1st major piece of good news regarding this busted bolt, as I feared that I would have had to ship the engine to Wisconsin or Florida or some such.  Having Shane here is a tremendous asset!


IMG 4849

Major surgery on the engine.

The back cover was removed, along with the L carburetor to gain better access to bolts.  The starter was removed.  A pin was inserted through a magic hole that permitted the crankshaft to be locked in place. A 7’ breaker bar was needed to unseat the bolt that held on the flywheel.  The flywheel was removed, finally showing the rear section of the engine (accessory case?) without obstacles.  Note that the mount is still in place.  To remove the mount would require removing all of the cooling system and ignition systems, but this was deemed not needed (although having the mount out of the way would have been convenient!)  The accessory case (that’s what I’m calling it here: correct me if you know a better term) was broken loose (RTV sealant held it to the main case) and—finally—the Offending Bolt was revealed.

IMG 4851

The Offending Bolt

The offending bolt is seen at about 6:30 in this image.  We debated just grabbing it with vice grips, but Shane elected a more nuanced approach.  A metric nut was threaded onto the exposed threads.  Rather than risking any heat damage with welding, a more traditional approach of drilling and using a screw extractor was selected.  The nut was there to keep the drill from wandering too much and/or weakening the bolt and having it fail radially.  It came out without a hitch.  (Unfortunately, I had to leave the hanger for this particular maneuver, thus I don’t have  picture of the actual removal.)


IMG 4854

Engine back on Airframe

Three hours later, the engine was re-assembled, trundled out of Shamrock Aviation’s nice heated hanger and back to the relatively hostile environment of C-1, and hung back on the airframe.   I’m taking today off from playing in the hanger, but hope to return tomorrow & Thursday to start reattaching all of the various systems to the engine.  I will also take advantage of the exposed nature of the beast to install a Reiff engine/oil heater system to pre-heat things on these cold winter days.

Monday, December 14, 2015

many steps backwards

Well, it’s been a month since I posted and it’s time to let you all know that I’m still alive & kicking.   The broken bolt will hopefully be removed in a few weeks (more about that in a moment.)   For now, I’m here to report that the engine is off of the plane and enough accessories have been removed to gain access to the generator, which will have to be removed to get to the bolt in question.

Steve Beaver follows the AV8tors group and is in the hanger next to the Cardinal.  He graciously lent me an engine hoist which I trundled from F8 to C1.

Dave Rohlick, who had helped drive the plane from Westerville to DLZ, volunteered an afternoon to finish unhooking and actually pulling the engine off. All in all, it didn’t go too badly.   Of all of the connections, there was only 1 wire that needed to be divided.  (Specifically, the “easy start” wire from the key switch panel to the ignition modules.  I don’t have the tool to remove the pins from the connectors, and did not want to remove the ignition modules if I didn’t have to.  That wire was cut and will be re-connected with the spade/blade connecters used for the EGT probes.)

Alas, after we pulled the engine, the magnitude of the fractured bolt revealed itself to be of serious issue.  Recall its dimensions: M6x90.  That 90 refers to mm.  I estimate that the bolt broke at about 70 mm or so.  The water pump was removed, but it’s only about 20 mm thick.  In other words, the broken fragment is at the bottom of a 50 mm hole and is essentially unreachable.

At the bottom of my despair, I imagined that I would have to ship the engine to a distant shop for removal of the generator on the rear end.  (Removing the generator should expose the broken bolt for removal.)  As fortune would have it, Shane (proprietor of Shamrock Aviation) is rated Heavy Maintenance on the Rotax 912 family and is qualified to remove said generator here at DLZ.

He came over to the hanger last Friday and looked things over.  He’s got an engine in the shop now and will need to finish that up and make room for mine.  (He has a dedicated area for working on one engine at a time.)   I’ve got the 1st week of January off work and he quickly suggested that I come to the shop and watch/do much of the work involved in the project.  BTW, he estimates it to be a 1 day job—much better than my guess!

If all goes well, I will return to the project on Jan 4 to remove the generator, remove the bolt, reinstall the generator and get the engine back to the hanger.  From there, re-hang the engine, re-attach all of the connections & plumbing and get back to trying to be airworthy.


IMG 4819

Major Surgery

IMG 4821

ugly mess of an amputated engine


Friday, November 13, 2015

Well, damn. Fractured water pump bolt.

VAF Forums  


VAF Forums (http://www.vansairforce.com/community/index.php)
-   RV-12 (http://www.vansairforce.com/community/forumdisplay.php?f=73)
-   -   can you substitute class 12.9 for 8.8 bolts? (http://www.vansairforce.com/community/showthread.php?t=131641)


dbhill916 11-16-2015 03:43 PM

can you substitute class 12.9 for 8.8 bolts?
 
Hi all,


Is it safe to use bolts that are stronger than specified by Rotax, or will there be an unintended consequence (e.g., damage to the internal threads, etc.)?

I over torqued the metric bolts on my water pump housing and will be pulling the engine to remove & replace the affected bolts. Unfortunately, LEAF is quoting 6 weeks to get replacement M6x90 bolts. I have located a domestic source of M6x90 bolts, but they appear to be considerably stronger as they are Class 12.9, vs Class 8.8 as found on one of the ruined bolts in my possession.  

A quick internet search shows that Class 8.8 has a yield strength of 660 MPa while Class 12.9's yield strength is 1100 MPa. Is it possible to do damage using bolts that are too strong? Will the torque specifications be the same? If not, is there a known conversion? If not, then I will not use them and will just wait for Christmas. 

thanks in advance,
-dbh


Captain Avgas 11-16-2015 06:40 PM

Stick with 8.8
 
Quote:

Originally Posted by dbhill916 (Post 1029996)
Hi all,


Is it safe to use bolts that are stronger than specified by Rotax, or will there be an unintended consequence (e.g., damage to the internal threads, etc.)?

I over torqued the metric bolts on my water pump housing and will be pulling the engine to remove & replace the affected bolts. Unfortunately, LEAF is quoting 6 weeks to get replacement M6x90 bolts. I have located a domestic source of M6x90 bolts, but they appear to be considerably stronger as they are Class 12.9, vs Class 8.8 as found on one of the ruined bolts in my possession.  

A quick internet search shows that Class 8.8 has a yield strength of 660 MPa while Class 12.9's yield strength is 1100 MPa. Is it possible to do damage using bolts that are too strong? Will the torque specifications be the same? If not, is there a known conversion? If not, then I will not use them and will just wait for Christmas. 

thanks in advance,
-dbh

The long answer to this requires a thesis on bolts. The short answer is to replace the 8.8 bolts with the same grade as specified by the engine manufacturer. This is not a moment for backyard intuitive engineering on your engine which is, after all, your life support system.

12.9 bolts have a high ultimate tensile strength but a low ductility (they're more brittle). If they're plated they're also much more prone to hydrogen embrittlement. That could be crucial in this instance. They also need to be torqued up to a much higher proof load than 8.8s.

In engineering, more is sometimes less. Play it safe and stick with 8.8.


RFSchaller 11-16-2015 11:56 PM

Bob,

I agree with your observation, but look at the application. I wouldn't lose any sleep over more brittle bolts in the application of water pump pressure boundary retention. Landing gear would be a different story.

Rich


Jesse 11-17-2015 07:23 AM

Have you tried contacting Lockwood in FL? They may have what you need in stock.


Captain Avgas 11-17-2015 08:28 AM

Quote:

Originally Posted by RFSchaller (Post 1030143)
Bob,

I agree with your observation, but look at the application. I wouldn't lose any sleep over more brittle bolts in the application of water pump pressure boundary retention. Landing gear would be a different story.

Rich

Rich, put it this way. If the OP uses the specified fasteners he will be 100% safe. If he does not then there could be ramifications that the layman cannot understand. For instance the depth of female thread available may be specifically engineered for an 8.8 bolt and may be insufficient for the higher torque required for a 12.9 bolt. Consequently he may strip the female thread or damage it such that it fails down the track in flight. Neither scenario would good. Alternatively there are other dangers in not torquing a 12.9 fastener to its specified torque.

The fact that the OP is asking this question on this forum suggest to me that he is not an engineer and therefore my recommendation to him is to use the Rotax specified fasteners at the Rotax specified torque. 

My other concern would be whether when the OP overtorqued the original bolts he damaged the female threads at that time.


GaryK 11-17-2015 09:34 AM

Try McMaster Carr
 
Dave,
Did you try McMaster Carr. They usually have most in stock

Gary


David Paule 11-17-2015 10:33 AM

Don't Change the Torque
 
There's no change to the assembly torque if you go with a higher-strength bolt, provided -

The thread form hasn't changed,
The material remains steel,
the head type is the same,
the thread engagement is the same,
the same washers or nuts are used,
and the same lubrication or lack of it is used upon assembly.

If all these are true, then the torque to preload relationship is unchanged, and you should use the original assembly torque to obtain the bolt preload, the clamping force, which the designers wanted. A higher-strength bolt DOES NOT need higher torque in this type of a replacement situation. It might well be damaging. 

You'd use a higher torque in a wholly new design that fully uses the higher strength of the new bolt, but not for a replacement bolt.

Dave


DanH 11-17-2015 11:20 AM

May I request some clarification please? Here's my understanding, and I would appreciate the education if I'm misinformed.

The clamping force applied by a bolt is fundamentally a function of its elastic modulus, and all steels have roughly the same modulus of elasticity, about 3.0^7 psi.

The mechanical difference between the 12.9 and 8.8 is yield strength (roughly 90% of 1200 MPa vs 80% of 800 MPa). That means the 12.9 can be stretched further (i.e. torqued to some higher value) before it yields, which of course increases the clamp force. If an 8.8 and a 12.9 have the same modulus, then stretching them equally (same torque, assuming same thread pitch, form, and friction) should result in the same clamp force.

There's no reason why a 12.9 mustbe torqued to a higher level. The required clamp force is usually dictated by the anticipated cyclical stress; we want the clamp force to be higher than the cyclical stress which tries to pull the clamped joint apart. If an 8.8 was adequate in this regard, a 12.9 should be fine. 

Lower ductility for a 12.9 has no bearing on this discussion. It merely indicates a short plastic region on the stress-strain plot. The stress applied here, using the torque specified for the 8.8, would not put a 12.9 anywhere near that plastic region.

So what am I missing?

POSTSCRIPT....just posted to find Dave has already covered the question.


Captain Avgas 11-17-2015 09:05 PM

My guess is that the original 8.8 bolt will be a mil spec product with cad plating. Cad plating is very lubricious and has a lower coefficient of friction compared to unplated steel. 12.9 fasteners are normally black steel due to the quality control problems associated with plating such a high strength alloy. Of course using a black bolt has it own shortcomings in terms of corrosion. But all other things being equal, the black 12.9 will have to be torqued to a higher level than the cad plated 8.8 to achieve the same clamping force. Now one could go to Milspec-HDBK-60 to get a detailed formula for calculating the torque based on various friction co-efficients. But I don't think the OP is going to do that.

So under the circumstances I still think that the conservative approach for the OP to take would be to obtain the engine manufacturer's specified bolts with the same plating and use the engine manufacturer's specified torque.


BillL 11-17-2015 09:24 PM

Quote:

Originally Posted by David Paule (Post 1030215)
There's no change to the assembly torque if you go with a higher-strength bolt, provided -

The thread form hasn't changed,
The material remains steel,
the head type is the same,
the thread engagement is the same,
the same washers or nuts are used,
and the same lubrication or lack of it is used upon assembly.

If all these are true, then the torque to preload relationship is unchanged, and you should use the original assembly torque to obtain the bolt preload, the clamping force, which the designers wanted. A higher-strength bolt DOES NOT need higher torque in this type of a replacement situation. It might well be damaging. 

You'd use a higher torque in a wholly new design that fully uses the higher strength of the new bolt, but not for a replacement bolt.

Dave

Yep, my thoughts exactly. And- I have never seen an engine bolt installed with dry torque. Preload, pre stretched, and torqued to length, but not dry.


RFSchaller 11-17-2015 10:36 PM

Bob,

As an engineer you know we make our bread and butter answering the questions about what should be done when the OEM specs aren't met. I would not disagree with your statements, but I do think you are being overly conservative in this application. Maybe it's just my experience as a home builder seeing other applications, but I would still be comfortable with his suggested substitution. There are only a few critical applications like landing gear, cylinder head retention and prop bolts that raise the hairs on the back of my neck. Even if one bolt did fail on the water pump (and why would it since preload is most of the stress) you'd just get a leak you could address. I think the probability and consequences in this application result in low risk.

Rich


tjo 11-18-2015 12:33 AM

You guys are way over thinking this. The substitution is fine unless we are talking about cylinder bolts, or case bolts, or rod bolts, but if that were true, they wouldn't be grade 8.8, which is the SAE grade 5 equivalent.

It sounds like they used the low strength bolts to save the case and make it so the bolt would fail if over torqued. I think the only risk with a higher strength bolt is overtorquing and damaging the engine case (or whatever the bolt is threading into).

Tim


Captain Avgas 11-18-2015 04:58 AM

Quote:

Originally Posted by RFSchaller (Post 1030394)
Bob,

I would not disagree with your statements, but I do think you are being overly conservative in this application.  
Rich

Rich, you are right, in this particular case I have been extremely conservative, maybe too conservative. But in my defence I have had one eye on the original question and the other eye on the VansAirforce general audience, the bulk of whom do not come from a scientific background. We owe it to them to stress that changing out structural fasteners with those in any way different from that specified by the design engineer is not an option to be taken lightly by the uninitiated. At least the original poster had the common sense to ask the question and he should receive credit for that. 

I have been impressed with the technical calibre of posts made by all the contributors to this thread and I'm confident the OP can now make an informed decision.


dbhill916 11-18-2015 05:53 AM

thank you
 
Quote:

Originally Posted by Captain Avgas (Post 1030427)
...At least the original poster had the common sense to ask the question and he should receive credit for that. 

I have been impressed with the technical calibre of posts made by all the contributors to this thread and I'm confident the OP can now make an informed decision.

Gentlemen all,

I thank you all for the wealth of information and opinion. Many decades ago I was an engineer, but I think that only makes it dangerous for me to rely on my own analyses; thus the reason I asked the question here. The responses were exactly the kind of engineering discussion that is so informative on what might be perceived as an apparently trivial topic (nothing is trivial in aviation engineering!).  

Jesse gets the credit for the optimal solution:) : Lockwood's web site shows that not only are they in stock, but they're much cheaper than LEAF's (except for the shipping fees.) Hopefully, I will have the best of both worlds: original specifications and timely availability.

In the event that they aren't shipped any time soon, I will wait until I find the original spec 8.8's.

thanks again for a lively discussion,
-dbh
:)


All times are GMT -5. The time now is 05:54 AM.  


----------------

Update 11/16/15, notice posted on Van’s Air Force:

Hi all,

Is it safe to use bolts that are stronger than specified by Rotax, or will there be an unintended consequence (e.g., damage to the internal threads, etc.)?
I over torqued the metric bolts on my water pump housing and will be pulling the engine to remove & replace the affected bolts. Unfortunately, LEAF is quoting 6 weeks to get replacement M6x90 bolts. I have located a domestic source of M6x90 bolts, but they appear to be considerably stronger as they are Class 12.9, vs Class 8.8 as found on one of the ruined bolts in my possession. 

A quick internet search shows that Class 8.8 has a yield strength of 660 MPa while Class 12.9's yield strength is 1100 MPa. Is it possible to do damage using bolts that are too strong? Will the torque specifications be the same? If not, is there a known conversion? If not, then I will not use them and will just wait for Christmas. 

thanks in advance,

-dbh

---------------------------------------------------- 

I spent a few hours at the local A&P trying to get the carbs balanced, but we never got the engine to run smoothly.  That’s the good news.  When we were standing around trying to figure out what we were missing, I noted that the front gear strut was wet.  Following the moisture trail upwards led to the discovery that one of the bolts holding the water pump to the engine case was ‘loose’.  Loose, as in “slides out with no resistance.”  I had a sinking feeling and fished it out completely.  Yep, it’s fractured right though the threads.

 If you go back to http://n76012.blogspot.com/2015/02/46-06-engine-mount.html, you’ll see that I had to remove the water pump housing to get the engine mount on.  Thinking back, I remember being amazed at how high the torque settings were to seat those bolts back onto the water pump.  In retrospect, I’m guessing I used ft-lbs instead of in-lbs and probably overtorqued these guys by a factor of 12.  Damn.

This discovery was last Wednesday.  I’m looking for some time to go through the various manuals and catalogs to order the correct replacement bolts from LEAF.  I expect it will take two days of labor to remove the engine.  A friend has offered to help back out the remnants of the bolt from the engine, and hopefully we won’t find any more broken bolts to deal with.   With any luck, I’ll have Thursday & Friday of next week to tackle this setback.


IMG 4763

Fractured water pump bolt


Home > VansAirForceForums

POSTING RULES 
Donate yearly (please).
Advertise in here!

Today's Posts | Insert Pics


Go Back   VAF Forums Model Specific RV-12
Welcome, dbhill916.
You last visited: Today at 05:01 AM 
Private Messages: Unread 0, Total 16.
User CP FAQ Members List Calendar New Posts Quick Links  Log Out

Reply
Thread Tools  Search this Thread  Rate Thread  Display Modes 
  #1   Report Post  
Old 11-16-2015, 03:43 PM
 
Join Date: May 2013
Location: Columbus, OH
Posts: 77
 
Default can you substitute class 12.9 for 8.8 bolts?

Hi all,


Is it safe to use bolts that are stronger than specified by Rotax, or will there be an unintended consequence (e.g., damage to the internal threads, etc.)?

I over torqued the metric bolts on my water pump housing and will be pulling the engine to remove & replace the affected bolts. Unfortunately, LEAF is quoting 6 weeks to get replacement M6x90 bolts. I have located a domestic source of M6x90 bolts, but they appear to be considerably stronger as they are Class 12.9, vs Class 8.8 as found on one of the ruined bolts in my possession.  

A quick internet search shows that Class 8.8 has a yield strength of 660 MPa while Class 12.9's yield strength is 1100 MPa. Is it possible to do damage using bolts that are too strong? Will the torque specifications be the same? If not, is there a known conversion? If not, then I will not use them and will just wait for Christmas. 

thanks in advance,
-dbh
__________________
-------------
David B. Hill
RV-12-0760
N76012 
http://n76012.blogspot.com
Dues paid through 6-2016
Edit/Delete Message Reply With Quote Multi-Quote This Message Quick reply to this message
  #2   Report Post  
Old 11-16-2015, 06:40 PM
 
Join Date: Oct 2005
Location: Melbourne, Australia
Posts: 1,469
 
Default Stick with 8.8

Quote:
Originally Posted by dbhill916 View Post
Hi all,


Is it safe to use bolts that are stronger than specified by Rotax, or will there be an unintended consequence (e.g., damage to the internal threads, etc.)?

I over torqued the metric bolts on my water pump housing and will be pulling the engine to remove & replace the affected bolts. Unfortunately, LEAF is quoting 6 weeks to get replacement M6x90 bolts. I have located a domestic source of M6x90 bolts, but they appear to be considerably stronger as they are Class 12.9, vs Class 8.8 as found on one of the ruined bolts in my possession.  

A quick internet search shows that Class 8.8 has a yield strength of 660 MPa while Class 12.9's yield strength is 1100 MPa. Is it possible to do damage using bolts that are too strong? Will the torque specifications be the same? If not, is there a known conversion? If not, then I will not use them and will just wait for Christmas. 

thanks in advance,
-dbh
The long answer to this requires a thesis on bolts. The short answer is to replace the 8.8 bolts with the same grade as specified by the engine manufacturer. This is not a moment for backyard intuitive engineering on your engine which is, after all, your life support system.

12.9 bolts have a high ultimate tensile strength but a low ductility (they're more brittle). If they're plated they're also much more prone to hydrogen embrittlement. That could be crucial in this instance. They also need to be torqued up to a much higher proof load than 8.8s.

In engineering, more is sometimes less. Play it safe and stick with 8.8.
__________________
Regards
Bob Barrow
RV7A
Reply With Quote Multi-Quote This Message Quick reply to this message
  #3   Report Post  
Old 11-16-2015, 11:56 PM
 
Join Date: Oct 2010
Location: Phoenix, AZ
Posts: 1,509
 
Default

Bob,

I agree with your observation, but look at the application. I wouldn't lose any sleep over more brittle bolts in the application of water pump pressure boundary retention. Landing gear would be a different story.

Rich
Reply With Quote Multi-Quote This Message Quick reply to this message
  #4   Report Post  
Old Yesterday, 07:23 AM
Jesse's Avatar  
Join Date: May 2005
Location: Dunnellon, FL
Posts: 1,649
 
Default

Have you tried contacting Lockwood in FL? They may have what you need in stock.
__________________
Jesse Saint (Saint Aviation, Inc. - VAF Advertiser)
352-427-0285
jesse@saintaviation.com
RV Hotel (hangar, room, car) at X35 in north FL

Commercial ASEL/S A&P/IA EAA Technical Counselor

RV-10 N256H 1,300+ hrs

Dynamic Prop Balancing, Prebuy Inspections, Condition Inspections, Repairs and Mods, Airframe, Engine, Avionics and Ferrying
Reply With Quote Multi-Quote This Message Quick reply to this message
  #5   Report Post  
Old Yesterday, 08:28 AM
 
Join Date: Oct 2005
Location: Melbourne, Australia
Posts: 1,469
 
Default

Quote:
Originally Posted by RFSchaller View Post
Bob,

I agree with your observation, but look at the application. I wouldn't lose any sleep over more brittle bolts in the application of water pump pressure boundary retention. Landing gear would be a different story.

Rich
Rich, put it this way. If the OP uses the specified fasteners he will be 100% safe. If he does not then there could be ramifications that the layman cannot understand. For instance the depth of female thread available may be specifically engineered for an 8.8 bolt and may be insufficient for the higher torque required for a 12.9 bolt. Consequently he may strip the female thread or damage it such that it fails down the track in flight. Neither scenario would good. Alternatively there are other dangers in not torquing a 12.9 fastener to its specified torque.

The fact that the OP is asking this question on this forum suggest to me that he is not an engineer and therefore my recommendation to him is to use the Rotax specified fasteners at the Rotax specified torque. 

My other concern would be whether when the OP overtorqued the original bolts he damaged the female threads at that time.
__________________
Regards
Bob Barrow
RV7A

Last edited by Captain Avgas : Yesterday at 08:34 AM.
Reply With Quote Multi-Quote This Message Quick reply to this message
  #6   Report Post  
Old Yesterday, 09:34 AM
GaryK's Avatar  
Join Date: Nov 2005
Location: Zeeland, Michigan
Posts: 211
 
Default Try McMaster Carr

Dave,
Did you try McMaster Carr. They usually have most in stock

Gary
Reply With Quote Multi-Quote This Message Quick reply to this message
  #7   Report Post  
Old Yesterday, 10:33 AM
 
Join Date: Dec 2009
Location: Boulder, CO
Posts: 2,319
 
Default Don't Change the Torque

There's no change to the assembly torque if you go with a higher-strength bolt, provided -

The thread form hasn't changed,
The material remains steel,
the head type is the same,
the thread engagement is the same,
the same washers or nuts are used,
and the same lubrication or lack of it is used upon assembly.

If all these are true, then the torque to preload relationship is unchanged, and you should use the original assembly torque to obtain the bolt preload, the clamping force, which the designers wanted. A higher-strength bolt DOES NOT need higher torque in this type of a replacement situation. It might well be damaging. 

You'd use a higher torque in a wholly new design that fully uses the higher strength of the new bolt, but not for a replacement bolt.

Dave

Last edited by David Paule : Yesterday at 10:37 AM.
Reply With Quote Multi-Quote This Message Quick reply to this message
  #8   Report Post  
Old Yesterday, 11:20 AM
DanH's Avatar  
Join Date: Oct 2005
Location: 08A
Posts: 5,549
 
Default

May I request some clarification please? Here's my understanding, and I would appreciate the education if I'm misinformed.

The clamping force applied by a bolt is fundamentally a function of its elastic modulus, and all steels have roughly the same modulus of elasticity, about 3.0^7 psi.

The mechanical difference between the 12.9 and 8.8 is yield strength (roughly 90% of 1200 MPa vs 80% of 800 MPa). That means the 12.9 can be stretched further (i.e. torqued to some higher value) before it yields, which of course increases the clamp force. If an 8.8 and a 12.9 have the same modulus, then stretching them equally (same torque, assuming same thread pitch, form, and friction) should result in the same clamp force.

There's no reason why a 12.9 mustbe torqued to a higher level. The required clamp force is usually dictated by the anticipated cyclical stress; we want the clamp force to be higher than the cyclical stress which tries to pull the clamped joint apart. If an 8.8 was adequate in this regard, a 12.9 should be fine. 

Lower ductility for a 12.9 has no bearing on this discussion. It merely indicates a short plastic region on the stress-strain plot. The stress applied here, using the torque specified for the 8.8, would not put a 12.9 anywhere near that plastic region.

So what am I missing?

POSTSCRIPT....just posted to find Dave has already covered the question.
__________________
Dan Horton 
RV-8 SS
Barrett IO-390

Last edited by DanH : Yesterday at 11:24 AM.
Reply With Quote Multi-Quote This Message Quick reply to this message
  #9   Report Post  
Old Yesterday, 09:05 PM
 
Join Date: Oct 2005
Location: Melbourne, Australia
Posts: 1,469
 
Default

My guess is that the original 8.8 bolt will be a mil spec product with cad plating. Cad plating is very lubricious and has a lower coefficient of friction compared to unplated steel. 12.9 fasteners are normally black steel due to the quality control problems associated with plating such a high strength alloy. Of course using a black bolt has it own shortcomings in terms of corrosion. But all other things being equal, the black 12.9 will have to be torqued to a higher level than the cad plated 8.8 to achieve the same clamping force. Now one could go to Milspec-HDBK-60 to get a detailed formula for calculating the torque based on various friction co-efficients. But I don't think the OP is going to do that.

So under the circumstances I still think that the conservative approach for the OP to take would be to obtain the engine manufacturer's specified bolts with the same plating and use the engine manufacturer's specified torque.
__________________
Regards
Bob Barrow
RV7A

Last edited by Captain Avgas : Yesterday at 09:55 PM.
Reply With Quote Multi-Quote This Message Quick reply to this message
  #10   Report Post  
Old Yesterday, 09:24 PM
 
Join Date: Sep 2007
Location: Chillicothe, IL
Posts: 2,287
 
Default

Quote:
Originally Posted by David Paule View Post
There's no change to the assembly torque if you go with a higher-strength bolt, provided -

The thread form hasn't changed,
The material remains steel,
the head type is the same,
the thread engagement is the same,
the same washers or nuts are used,
and the same lubrication or lack of it is used upon assembly.

If all these are true, then the torque to preload relationship is unchanged, and you should use the original assembly torque to obtain the bolt preload, the clamping force, which the designers wanted. A higher-strength bolt DOES NOT need higher torque in this type of a replacement situation. It might well be damaging. 

You'd use a higher torque in a wholly new design that fully uses the higher strength of the new bolt, but not for a replacement bolt.

Dave
Yep, my thoughts exactly. And- I have never seen an engine bolt installed with dry torque. Preload, pre stretched, and torqued to length, but not dry.
__________________
Bill Lane
Building 7 tipper. QB,Canopy : on hold
G3X/GNS 650 Panel, Built by SteinAir: Installed
IO-360 M1B, Hartzell CS Composite
Wiring 98% sans FWF.  
FWF:SJ Cowl & baffles fitted, air inlet diffusers, & 
new BL plenum=DONE Refitting -0 to -1 tips.

VAF Donation for 2014 w/ a little extra 
Reply With Quote Multi-Quote This Message Quick reply to this message
  #11   Report Post  
Old Yesterday, 10:36 PM
 
Join Date: Oct 2010
Location: Phoenix, AZ
Posts: 1,509
 
Default

Bob,

As an engineer you know we make our bread and butter answering the questions about what should be done when the OEM specs aren't met. I would not disagree with your statements, but I do think you are being overly conservative in this application. Maybe it's just my experience as a home builder seeing other applications, but I would still be comfortable with his suggested substitution. There are only a few critical applications like landing gear, cylinder head retention and prop bolts that raise the hairs on the back of my neck. Even if one bolt did fail on the water pump (and why would it since preload is most of the stress) you'd just get a leak you could address. I think the probability and consequences in this application result in low risk.

Rich
Reply With Quote Multi-Quote This Message Quick reply to this message
  #12   Report Post  
Old Today, 12:33 AM
tjo tjo is offline
 
Join Date: Dec 2009
Location: La Center,wa
Posts: 161
 
Default

You guys are way over thinking this. The substitution is fine unless we are talking about cylinder bolts, or case bolts, or rod bolts, but if that were true, they wouldn't be grade 8.8, which is the SAE grade 5 equivalent.

It sounds like they used the low strength bolts to save the case and make it so the bolt would fail if over torqued. I think the only risk with a higher strength bolt is overtorquing and damaging the engine case (or whatever the bolt is threading into).

Tim

Last edited by tjo : Today at 12:37 AM.
Reply With Quote Multi-Quote This Message Quick reply to this message
  #13   Report Post  
Old Today, 04:58 AM
 
Join Date: Oct 2005
Location: Melbourne, Australia
Posts: 1,469
 
Default

Quote:
Originally Posted by RFSchaller View Post
Bob,

I would not disagree with your statements, but I do think you are being overly conservative in this application.  
Rich
Rich, you are right, in this particular case I have been extremely conservative, maybe too conservative. But in my defence I have had one eye on the original question and the other eye on the VansAirforce general audience, the bulk of whom do not come from a scientific background. We owe it to them to stress that changing out structural fasteners with those in any way different from that specified by the design engineer is not an option to be taken lightly by the uninitiated. At least the original poster had the common sense to ask the question and he should receive credit for that. 

I have been impressed with the technical calibre of posts made by all the contributors to this thread and I'm confident the OP can now make an informed decision.
__________________
Regards
Bob Barrow
RV7A
Reply With Quote Multi-Quote This Message Quick reply to this message
  #14   Report Post  
Unread Today, 05:53 AM
 
Join Date: May 2013
Location: Columbus, OH
Posts: 77
 
Thumbs up thank you

Quote:
Originally Posted by Captain Avgas View Post
...At least the original poster had the common sense to ask the question and he should receive credit for that. 

I have been impressed with the technical calibre of posts made by all the contributors to this thread and I'm confident the OP can now make an informed decision.
Gentlemen all,

I thank you all for the wealth of information and opinion. Many decades ago I was an engineer, but I think that only makes it dangerous for me to rely on my own analyses; thus the reason I asked the question here. The responses were exactly the kind of engineering discussion that is so informative on what might be perceived as an apparently trivial topic (nothing is trivial in aviation engineering!).  

Jesse gets the credit for the optimal solution : Lockwood's web site shows that not only are they in stock, but they're much cheaper than LEAF's (except for the shipping fees.) Hopefully, I will have the best of both worlds: original specifications and timely availability.

In the event that they aren't shipped any time soon, I will wait until I find the original spec 8.8's.

thanks again for a lively discussion,
-dbh
__________________
-------------
David B. Hill
RV-12-0760
N76012 
http://n76012.blogspot.com
Dues paid through 6-2016
Edit/Delete Message Reply With Quote Multi-Quote This Message Quick reply to this message
 
Reply


Quick Reply
Message:
Remove Text Formatting
Bold
Italic
Underline

Insert Image
Wrap [QUOTE] tags around selected text
 
Decrease Size
Increase Size
Options


Posting Rules
You may post new threads
You may post replies
You may not post attachments
You may edit your posts

vB code is On
Smilies are On
[IMG] code is On
HTML code is Off
Forum Jump


All times are GMT -5. The time now is 05:53 AM.

The VAFForums come to you courtesy Delta Romeo, LLC. By viewing and participating in them you agree to build your plane using standardized methods and practices and to fly it safely and in accordance with the laws governing the country you are located in.